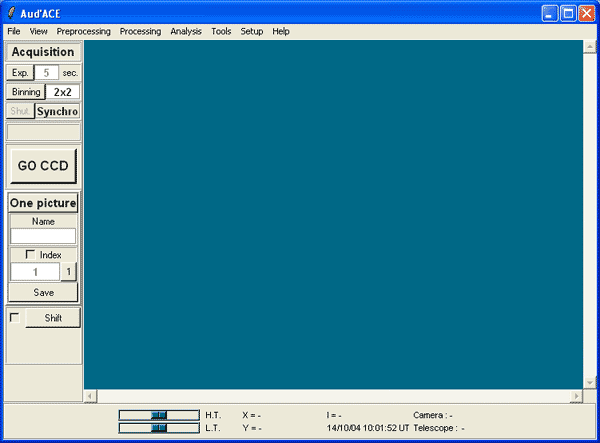
Main window of Audela with the Acquisition tool opened.

This is my main area of activity. And I must say that without the software program called Audela I probably would never have tried to hunt supernovae. Audela contains a dedicated tool that makes this search much more simple and interesting.
Because my equipment is no longer sufficient to search for new asteroids, I decided to turn to supernovae which seemed to me a more realistic target. Of course I am mainly motivated by the idea of being the first one to discover a new object in the sky. But another interesting thing is that looking for supernovae is a useful activity. It is real science somehow and outside the area of aesthetic images. Trying to shoot nice images is a wonderful activity for me but I do not want to do only that and want to make something useful as well.
The real plus of Audela is that it can do everything automatically for you: it chooses a list of appropriate galaxies depending on your location and the time of year, it points your telescope at every galaxy, it shoots the images, it processes them and stores them. You can actually leave your equipment outside the whole night and go to bed. When you wake up Audela has between 400 or 600 galaxy images ready for examination! And Audela can also help you examine the images to detect possible supernovae. What more could you ask?
So what do you need to look for supernovea?
First a Goto telescope, a digital camera and the Audela software. Because the first two elements are obvious I will only describe the third one here: Audela. Once you have aligned your telescope and focused your camera (both procedures are possible in Audela by the way), you need to run Audela. This is the screen you get:
Main window of Audela with the Acquisition tool opened.
This is the main interface in Audela. From there you have access to "Tools" which essentially help you carry out specific tasks. The Tool menu contains a sub-menu called Supernovae. You click on this sub-menu and a small box opens at the left hand side of the Audela main window. Here is what it looks like:

Main window of Audela with the Supernovae tool opened.
As you can see, you have 2 main options here: either Sn Acquisition or Sn View. The first option is used when your telescope is ready and you want to shoot images of galaxies that might contain supernovae. The second option is used when you want to check your images to see if they show a possible supernovae. So let's click on Sn Acq to see what it looks like and let's start our observing run:
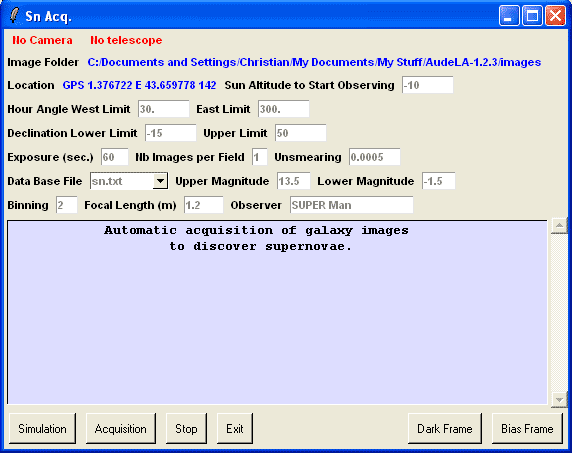
The supernovae dialog box.
At the top of the window, you see "No camera" and "No Telescope" because I had nothing connected to my PC at the time I took this screenshot but camera you use (Sbig or Audine or else) and the telescope will normally be displayed. This information is entered in the Settings menu of the software and are just copied here. Below is the path for your images and your location (also entered in the Settings). Then you find more specific information that must be entered. Here they are:
Now that you have filled in all these fields, we are going to click on the buttons at the bottom of the Supernovae window. Here they are:
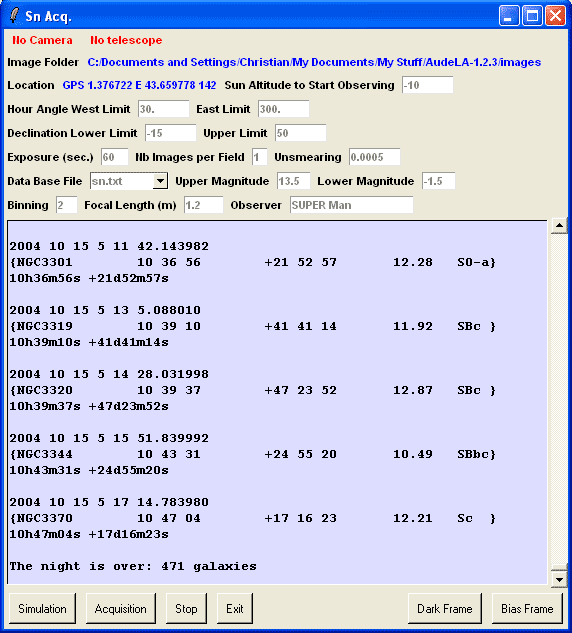
A simulation to know the data about the galaxies that will be acquired.
As you can see on the above screenshot, 471 galaxies were selected by Audela. All these galaxies meet the selection criteria we determined in the various fields we filled in (West limit, East limit, etc.). Audela needs less that a minute to compute this list. At this point you could change your selection criteria and recompute the list if you wanted to.
OK, so now we are ready to press the Acquisition button and leave Audela and your equipment do the rest. The images will appear in the Audela main window as they are shot and processed. The best thing to do is however to remain by the telescope for the first images to check that everything runs smoothly.
Now, suppose the night is over and you have your 488 images on the hard disk ready to be examined. What should you do? Use Audela again! This time you press on the Sn View button in Audela main interface. If you do that, this is what you are going to see:
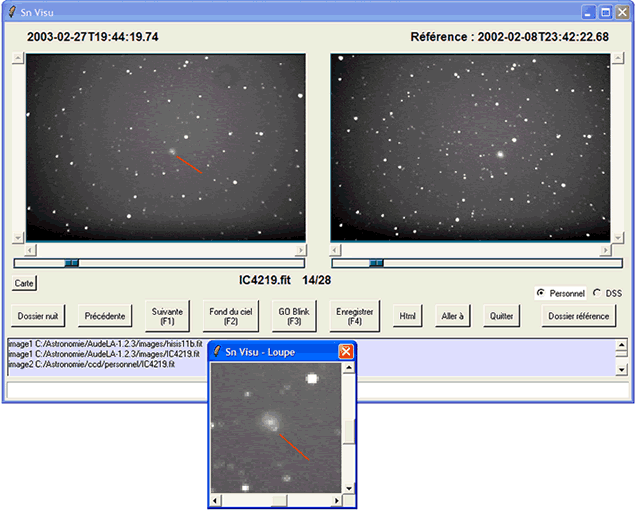
The viewing utility (here in French version) to examine your images and compare them to previous images of the same galaxies.
This window helps you examine your images and find supernovae. The left hand part of the window shows the images you have just shot the night before. The right window shows the same images (if any) you shot previously (could be a day ago or a month ago or else).
Here is the basic principle behind Sn View: you shoot a number of galaxy images on night 1. On night 2 you are going to shoot anoter round of galaxy images and a number of targets will be the same as on night 1. That means that you will be able to compare these images between the two nights. The galaxies of night 1 will be the reference images and will appear in the right hand window. The galaxies of night 2 will be the new images, they will appear in the left hand window and you will visually compare them to the same images of night 1.
Practically, when you want to compare night 2 images to night 1 images, you press the Reference Folder button (on the right) and you select the folder containing all the images of night 1 (the reference images). Then you press on the Image Folder button (on the left) and you select the the folder containing all the images of night 2. Then you press on the Next button and the first image of night 2 appears in the left window. If the same image exists in the reference folder (night 1), this image will appear in the right window. And you can now visually compare both images trying to find a white dot that is in the night 2 image and that is not in the reference image (more on this later).
When you start observing supernovae, only night 1 images will be your reference images. But when you have night 2 images, you are going to compare them to night 1. After looking for a supernovae in night 2 images, if there are no supernovae (which is unfortunately the most frequent case), you have several possibilities:
This means that little by little (night 3, night 4, etc.), your reference folder will contain more and more images that will be better and better. After 20 nights or so, it will be a real asset and will contain thousands of galaxies. All your newly acquired images will have a counterpart already existing in your reference folder and that will make your research more and more effective.
So how do you find supernovae on your images?
Basically you need one minute per image couple. Your eyes will spot any difference between the former and the new image. The difference will be a new white dot near the galaxy in the left hand window. But les's take an example:
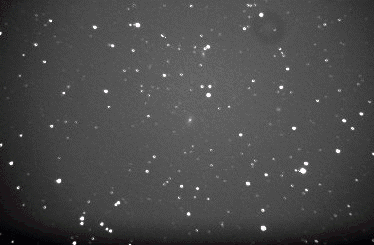
A galaxy without supernovae.
This is an image from a reference folder as it appears in Sn View. You notice the galaxy in the center. Now this is the same image from a new image folder:

Same galaxy but with a supernovae.
As you can see there is a new white dot at the bottom of the galaxy (arrow). This is how a supernovae appears when you discover one with Audela (and Audela has already helped several people in discovering supernovae).
But of course all new white dots are not necessarily a supernovae. Most of the time they are cosmic rays. The difference is not always obvious and you should go to the Alain Klotz's website (the author of this Audela panel and co-creator of Audela) for more details about that.
Cosmic rays usually appear as more precise and definite dots than stars which have a more blurred appearance. You can use the loop function to help you determine if it is a cosmic ray or a candidate supernovae. To do that you just click with the left mouse button on the area of the image that you want to see magnified. You even have a blink function that can also help you in comparing the two images. You just need to click on the Start Blink button.
As you see, really a lot can be done with Audela to search supernovae. If you interested by this field, you should download it and experiment with it. It is really great. If you need help,